NextClone
Nextflow pipeline for extracting and counting clonal barcodes
NextClone
NextClone is a Nextflow pipeline to facilitate rapid extraction and quantification of clonal barcodes from both DNA-seq and scRNAseq data. DNA-seq data refers to dedicated DNA barcoding data which exclusively sequences the synthetic lineage tracing clone barcode reads using Next Generation Sequencing.
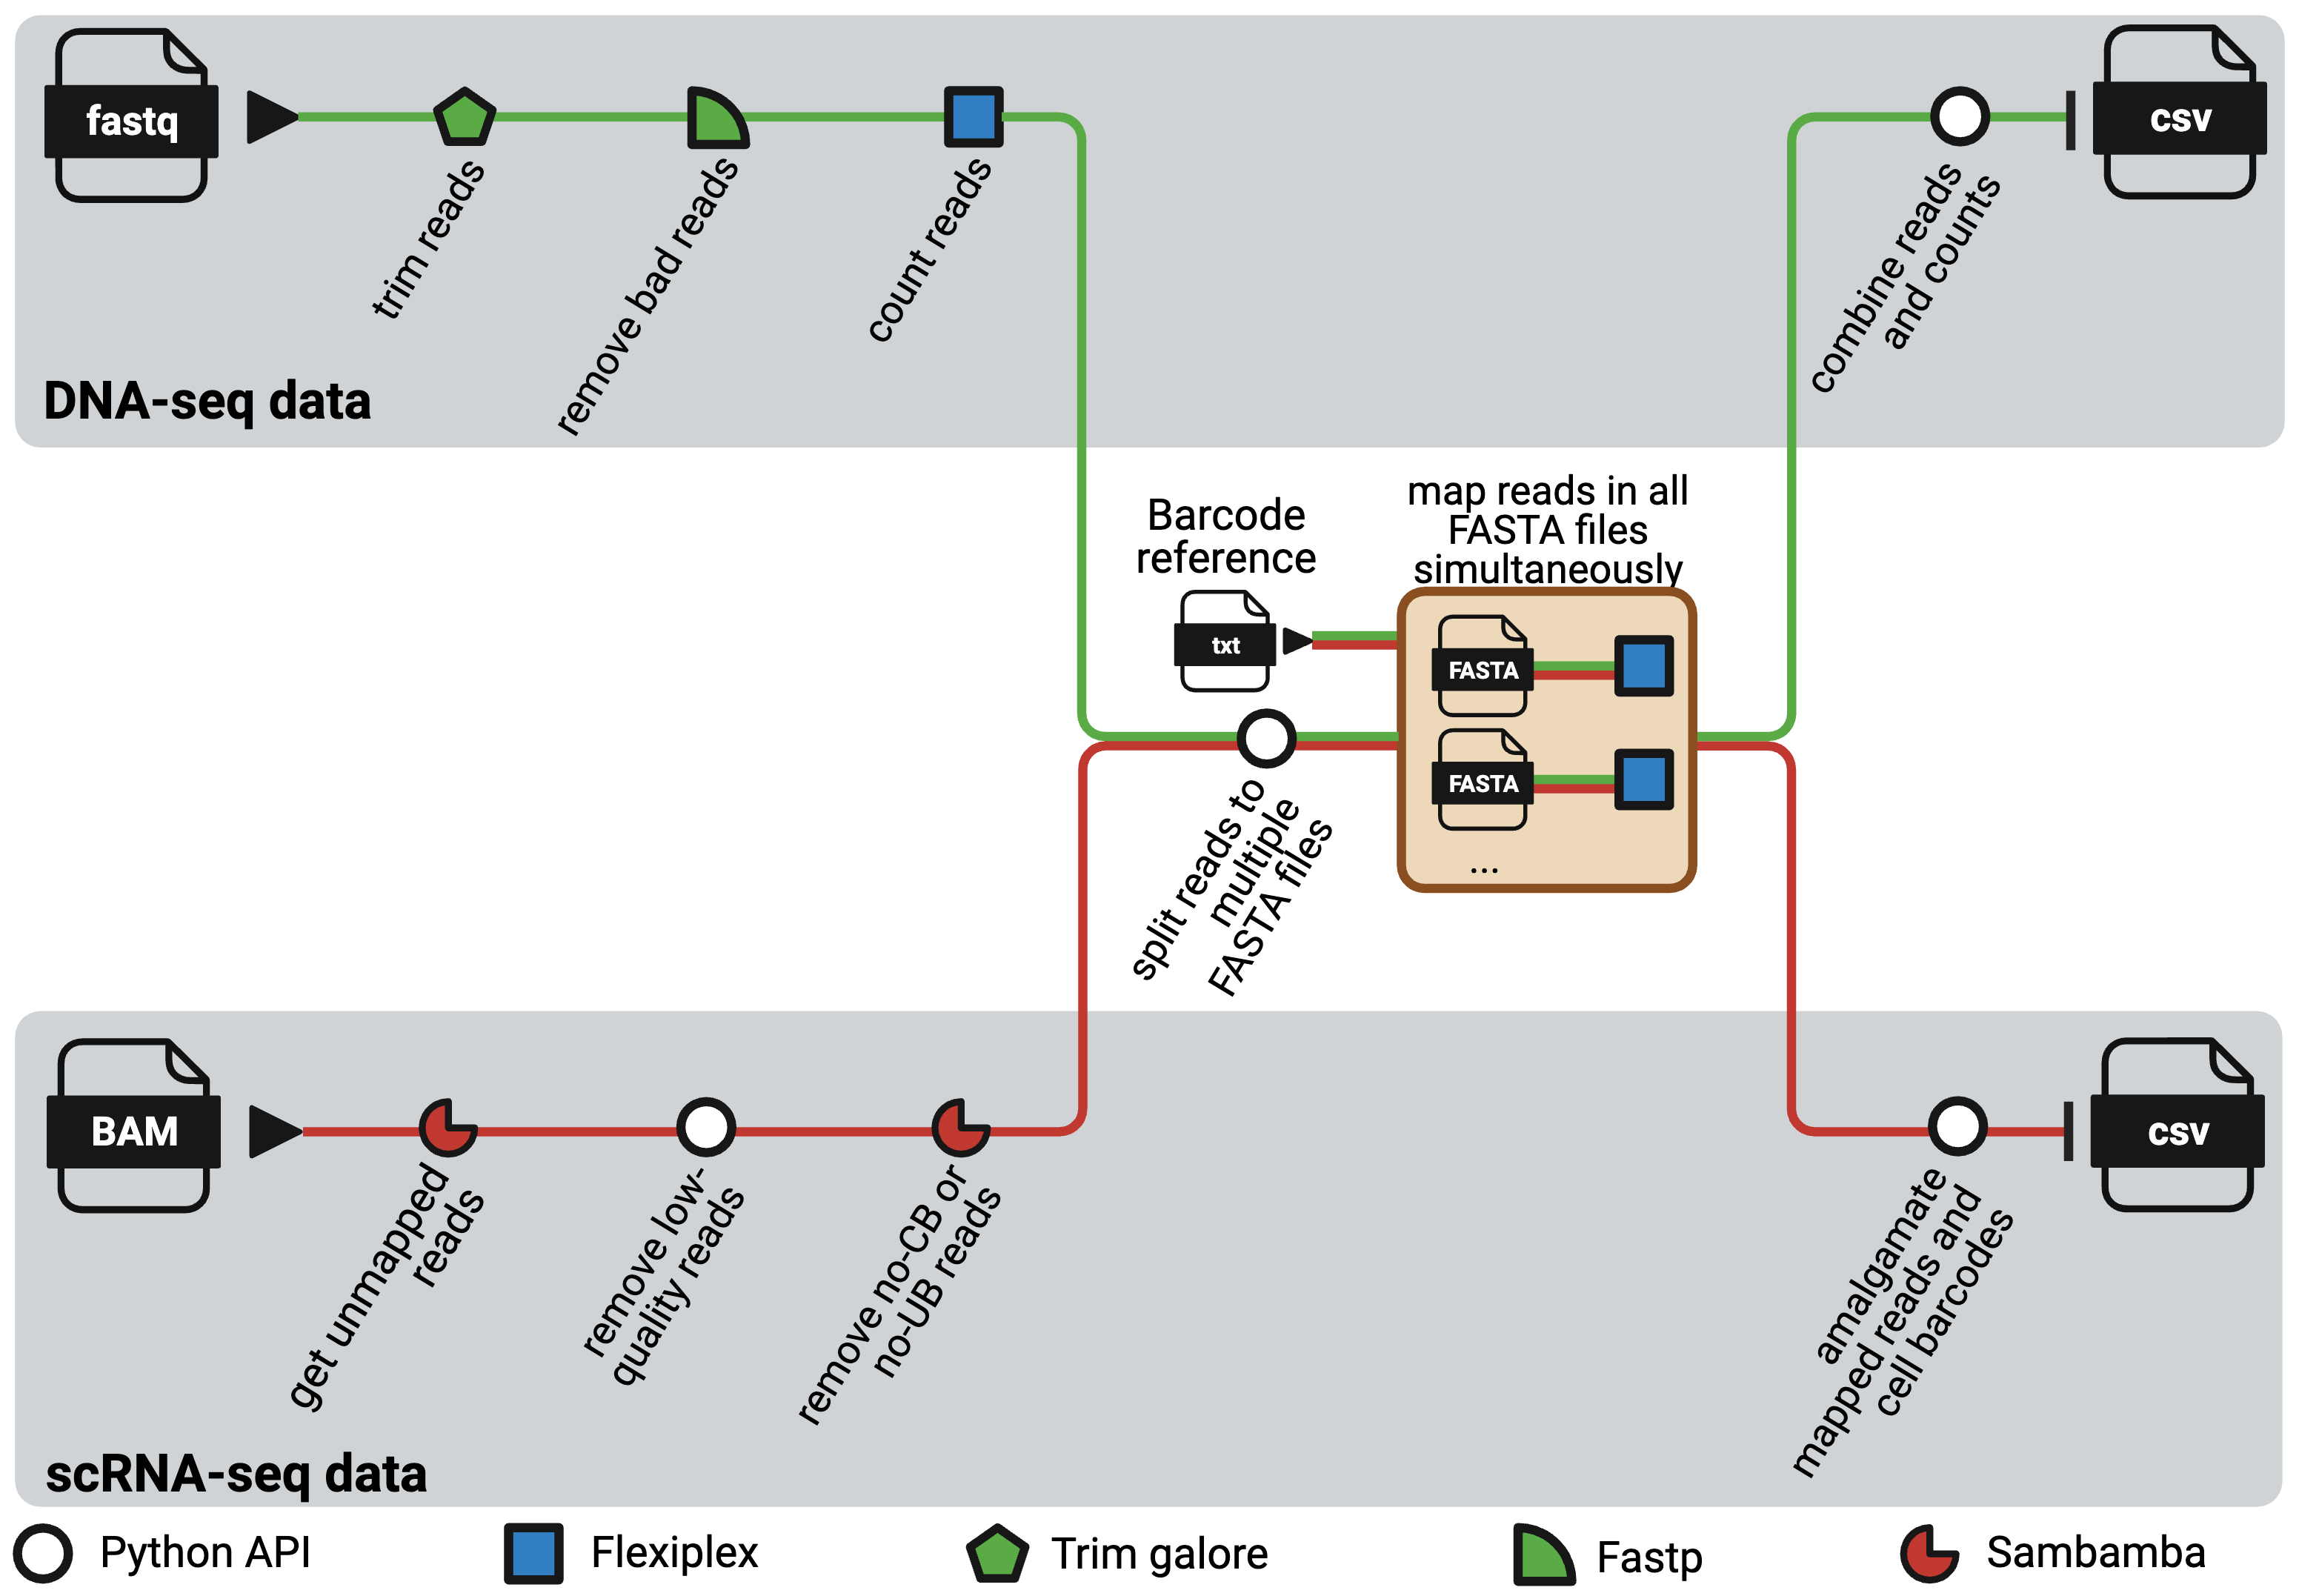
The pipeline comprises two distinct workflows, one for DNA-seq data and the other for scRNAseq data.
Both workflows are highly modular and adaptable, with software that can easily be substituted as required,
and with parameters that can be tailored through the nextflow.config` file to suit diverse needs.
It is heavily optimised for usage in high-performance computing (HPC) platforms.
Usage
In general, to run the pipeline, you can use the following command:
nextflow run phipsonlab/Nextclone -r main
However, chances are you will need to adjust some of the default parameters
in nextflow.config file.
Read on to find out what parameters there are and what do they mean.
Additionally, see the following more specific insturcitons for extracting clone barcodes from various barcoding libraries:
Output
For DNAseq data, you will get a clone_barcode_counts.csv file in the folder you
nominated as the publish_dir parameter.
For this csv file, each row corresponds to a unique clone barcode and its frequency in the sample.
For scRNAseq data, you will get a clone_barcodes.csv file in the folder you
nominated as the publish_dir parameter.
For this csv file, each row corresponds to a read associated with a 10x cell barcode, a UMI, and a clone barcode.
Clone barcode reference file
This is a text file where each row represents the sequence of a clone barcode.
It should look something like this:
CGGAGTAATACATTTTGCCT
TCGGAGTTGGCTGTCGTTTC
GTTGTCTCGGGGGGTGGAGA
CCATGATAAGGGAGTTCCGG
AGGGGAGTCGCGTGGTAGGC
TGTCTAATGGGGGTGTCACT
Generally, you will need to get this reference file from the lab that generates the lineage tracing barcode library for you.
Parallelisation within sample
The Python package within NextClone divides reads into several
FASTA files, which can be increased from the default two as
needed through the n_chunks parameter.
Each FASTA file then undergoes a mapping process against a reference list of clonal barcode sequences using Flexiplex running on multiple threads. Each mapping task is submitted as an individual job to the HPC scheduler, allowing all the tasks to be processed simultaneously as resources permit.
Do not specify too large number for n_chunks parameter as you risk overloading the HPC system.
Generally a number around 20 is reasonable.
It is also important to bear in mind that if you have multiple samples, by default, the n_chunks is applicable to every sample.
For instance, if you have 10 samples and specify n_chunks as 20, you will end up with 10*20 = 200 mapping jobs.
Parameters
These are all the default parameters used by NextClone.
They are all in the nextflow.config file.
You can change the value of any of these to suit your needs.
publish_dir_mode = 'copy'

mode = "DNAseq"

// generic
publish_dir = "${projectDir}/output"
clone_barcodes_reference = "${projectDir}/data/known_barcodes_subset.txt"
barcode_edit_distance = 2
n_chunks = 2
barcode_length = 20
// mapping may need long time, so use either long_mapping or regular_mapping
mapping_process_profile = "regular_mapping"


// for DNA-seq data
dnaseq_fastq_files = "${projectDir}/data/dnaseq_fastq_files"
fastp_percent_bases_unqualified = 20
fastp_phred_for_qualified_reads = 30

// for clonmapper single cell data
// change me if required
scrnaseq_bam_files = "${projectDir}/data/scrnaseq_bam_files"
phred_thres = 30
adapter_edit_distance = 6
adapter_5prime_clonmapper = "ATCTTGTGGAAAGGACGAAACACCG"
adapter_3prime_clonmapper = "GTTTCAGAGCTATGCTGGAAACAGC"
Explanation:
publish_dir_mode: determine whether to copy the intermediate files out or not. See Nextflow’s documentation for options.mode: tells NextClone to run the workflow for DNA-seq or scRNA-seq data. Options are DNAseq or scRNAseq (case sensitive).publish_dir: specifies the directory to copy the intermediate files and the final output to.clone_barcodes_reference: the location of the text file containing the list of reference clone barcodes to map the reads to.barcode_edit_distance: maximum edit distance to barcode when mapping. Used by Flexiplex.n_chunks: denotes how many chunks to split the reads to. Refer to parallelisation within sample section for more info.barcode_length: length of your lineage tracing barcode.mapping_process_profile: the HPC config used for mapping. Sometimes, mapping can take a long time, and it can be so long that you need to queue to task to a different queue. You can useregular_mappingorlong_mappingor in fact, any spec listed in thebase.configfile inconffolder.dnaseq_fastq_filesthe location of the FASTQ files containing your raw DNA-seq reads.fastp_percent_bases_unqualified: the default value 20 basically meant reads with over 20% of their nucleotides with phred quality scores below 30 (set byfastp_phred_for_qualified_reads) are removed.fastp_phred_for_qualified_reads: seefastp_percent_bases_unqualified. They work hand in hand.scrnaseq_bam_filesthe location of the BAM file generated by cellranger.phred_thres: the threshold used to remove low-quality reads from scRNAseq data. Reads with a mean phred score lower than this threshold are removed.adapter_edit_distance: the maximum edit distance used by Flexiplex when matching the adapters for the clone reads.adapter_5prime_clonmapper: the sequence for the 5’ adapter for your clone barcodes.adapter_5prime_clonmapper: the sequence for the 3’ adapter for your clone barcodes.
Setting up conda environment
NextClone relies on the following Python packages installed in a conda environment to work:
- python=3.8
- Biopython
- pandas
- natsort
- trim-galore
- fastp
If you are running NextClone for the very first time, it will attempt to create a conda environment and install the packages listed above. For this to happen, you will need to make sure that conda is installed in the system.
If you are using slurm, you can load the conda module up by using module load miniconda3/latest.
If this does not work, best contact the team that manages the HPC system to help you out.
In the future, this will be replaced with a singularity container.